EZ-NET Provider Portal
Authorization Submission Guide
For Nivano Physicians and PromiseCare Medical Group providers and office staff.
9 Steps
~5 Minutes
Clinical Documents Required
⚠ What You'll Need
- Member ID or patient date of birth
- Requesting provider's last name
- Requested provider's last name & specialty
- ICD-10 diagnosis codes — no decimal point
- CPT procedure codes with quantity for each
- Supporting clinical documentation (PDF, scans, etc.)
▶ What You'll Do (9 Steps)
- 1 Navigate to Auth Submission
- 2 Set Priority Status
- 3 Find the patient
- 4 Add the requesting provider
- 5 Add the requested provider
- 6 Select Place of Service
- 7 Enter diagnosis & procedure codes
- 8 Attach supporting documents
- 9 Add notes, submit & save tracking number
1
Navigate to Auth Submission
Main Navigation
- Click Auth/Referrals in the top navigation bar.
- In the dropdown, select Auth Submission. The Authorization Submission Entry form will open.
2
Set the Priority Status
Authorization Form
- The form defaults to Routine. For most requests, leave it as-is.
- If the request is clinically urgent, click the 🔍 magnifying glass next to Priority Status and choose the appropriate level.
3
Find the Patient
Authorization Form → Member Search Popup
- Click the 🔍 magnifying glass next to Member ID. The Member Search popup opens.
- In the Last Name field 2, type a partial last name and first name — or use Date of Birth instead.
- Click Search 1. When the patient appears in results, click their name to select. The popup closes and the form populates.
💡 Tip
Three letters is enough — “SMI” finds Smith, Smithson, etc. You don't need the full name.
📷 Member Search popup
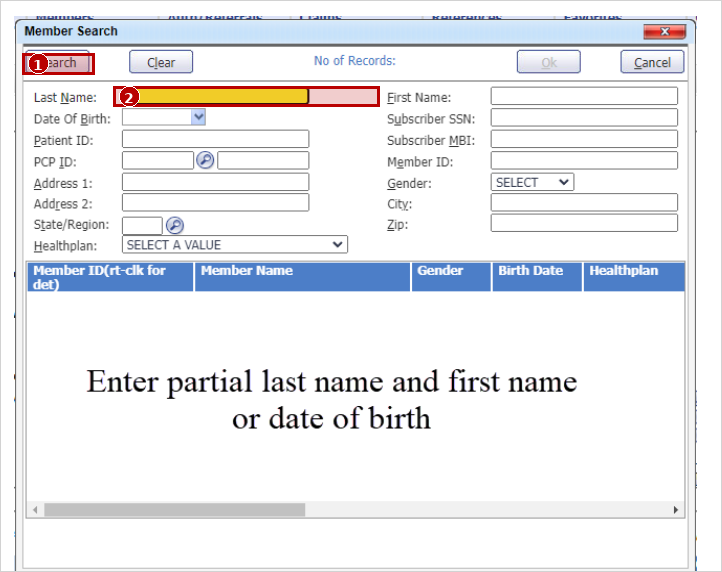
1 Click Search after entering name
2 Last Name field — partial name OK
4
Add the Requesting Provider
Authorization Form → Provider Search Popup
- Click the 🔍 magnifying glass next to Requesting Provider ID. This is the provider ordering the auth — typically the PCP or referring physician.
- Type the provider's last name and click Search.
- Click their row to highlight it, then click OK.
5
Add the Requested Provider
Authorization Form → Provider Search Popup
- Click the 🔍 magnifying glass next to Requested Provider ID. This is the provider who will perform the service — the specialist or facility.
- Click the 🔍 magnifying glass next to Specialty Code and pick the closest specialty. (UM will correct it if needed.)
- Search by last name, highlight the row, click OK.
Steps 4 and 5 follow the same pattern: open magnifying glass → search → highlight row → OK.
6
Select the Place of Service
Authorization Form
- Click the Place of Service dropdown and choose where the service will be performed.
- Common options: Office, Telehealth, Inpatient Hospital, Outpatient Hospital, Ambulatory Surgical Center.
7
Enter Diagnosis and Procedure Codes
Authorization Form — Service Requested Section
- Diagnosis: Type each ICD-10 code and click Add Diag. Repeat for each code. Up to 12 codes allowed.
- Procedures: Enter the CPT code and Qty, then click Add Proc. Repeat for each procedure.
❌ Critical — No Decimal Points on Diagnosis Codes
Enter ICD-10 codes without the decimal. Type J0690 — not J06.90. The system will error if you include a decimal point.
8
Attach Supporting Documents
Authorization Form → Document Management Popup
❌ Required — All Requests Need Documentation
You must attach at least one clinical document before submitting. Requests without documentation will not be processed.
- Click the 📎 attachment icon on the form. The Document Management popup opens.
- Click Add New Document 1.
📷 Document Management popup
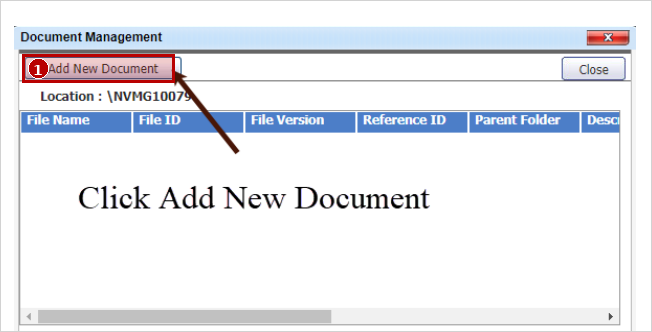
1 Click Add New Document
- In the File Upload dialog, click Choose File 1 and select the document from your computer.
- Fill in Reference ID 2 — a short file name (e.g., OfficeNote_050626).
- Fill in Description 3 — a full description of the document contents.
- Click Upload 4.
- Repeat for additional documents. When done, click Close to return to the main form.
📷 File Upload dialog
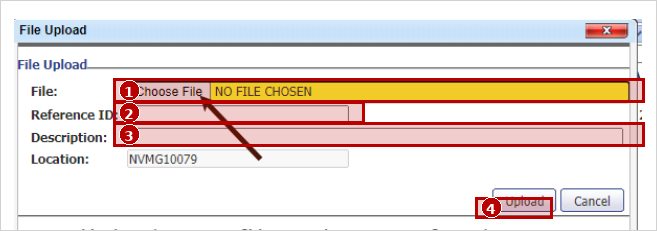
1 Choose File
2 Reference ID (short name)
3 Description (full description)
4 Upload button
9
Add Notes, Submit, and Save Your Tracking Number
Authorization Form → Confirmation Screen
- In the Auth Notes field, include: requesting provider name, rendering provider name, and facility name (if applicable).
- Click Submit Request.
- On the confirmation screen, write down or screenshot your tracking number 1. You'll need it to check status later.
⚠ Review Before Submitting
Submitted authorizations cannot be edited. Verify member, providers, codes, and attached documents before clicking Submit.
📷 Submission confirmation screen
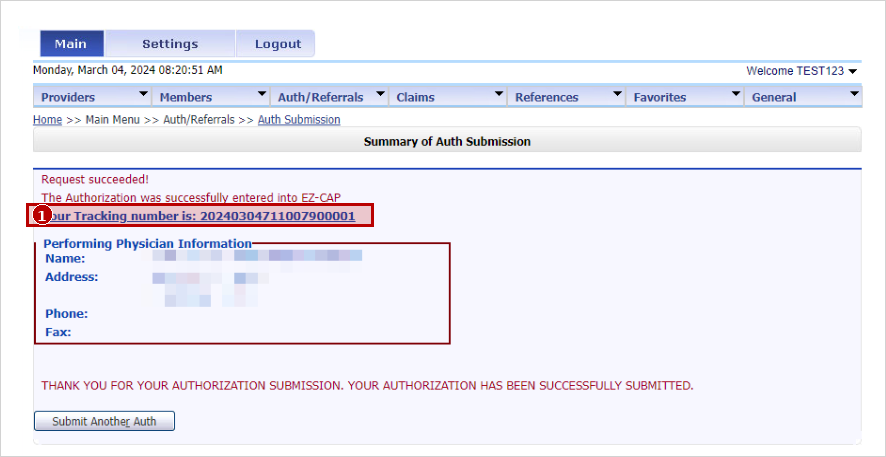
1 Tracking number — save this
✓ Authorization Successfully Submitted
Your request is now in the UM queue. Determination will be sent by fax or through the portal per your provider agreement timeline.
📋 Save your tracking number to check status later
Quick Reference
Diagnosis CodesNo decimal point — J0690 not J06.90. Up to 12 per request.
Documents RequiredEvery request needs clinical documentation. Upload before submitting.
Provider SearchSame pattern for steps 4 & 5: open magnifying glass → search → highlight → OK.
Specialty CodeBest guess is fine. UM will correct during review.
Auth NotesRequesting provider + rendering provider + facility (if needed).
Tracking NumberShown after submission. Save it to check auth status later.